Overview
Welcome! For the Kitty Eclipse project, we are using the Jetson Nano 2GB Developer Kit.
Operating System
This device is currently running Jetpack 4.6.2. It uses Jetson Linux R32.7.2, which is based on Ubuntu 18.04 (Bionic Beaver). This version has reached the end of support, but unfortunately, NVIDIA has not released any further updates for this device, so we need to use an operating system that hasn’t been updated for the past two years.
Storage & Boot
The Jetson Nano has two onboard ways to store data: the internal eMMC and a microSD card. Upon being powered on, the device will initially load the kernel stored on its internal storage. It’ll then boot the system stored on the device it is set up to boot from. In our case, it’ll load into the system stored on the microSD card using the kernel stored on the internal eMMC. This may cause issues if the kernels on the internal eMMC and microSD card are different, so see Booting the Latest Kernel for how this issue was solved.
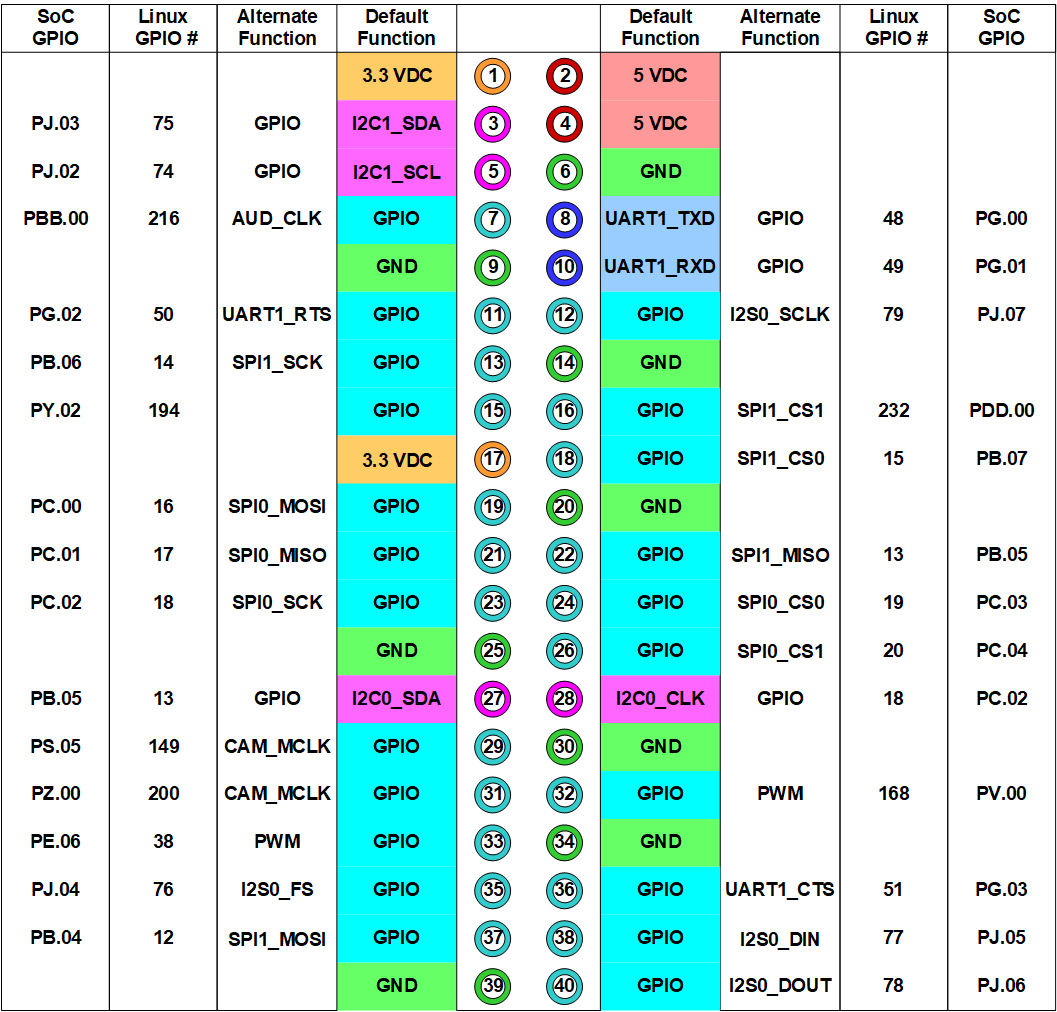
Pinout
Booting the Latest Kernel
As outlined in the overview, the Jetson Nano boots the system stored on the microSD card using the kernel stored on the internal eMMC.
The Problem
Linux has these things called Kernel Modules which provide functionally akin to drivers on Windows, such as having modules for Wi-Fi or graphics. If the corresponding modules for the booted kernel do not exist in the filesystem, these things will break. Furthermore, while the Jetson Nano loads the kernel stored on the internal eMMC, it loads the kernel modules stored on the microSD card instead, creating potential incompatibilities if the kernel modules on the microSD card do not correspond to the kernel booted from the internal eMMC.
Such a situation can arise if the system on the microSD card is upgraded. In this case, there is a newer version of the kernel and its modules. However, when the system upgrades, it removes the old version of the kernel and its modules since there is no need for them in theory. However, since the kernel on the internal storage is still the old kernel, the system will attempt to load the modules for the old kernel, which will fail because those modules no longer exist.
The Solution
To fix this problem, the /boot folder on the internal eMMC was moved to /boot.bak, and the /boot folder on the microSD card was copied to /boot on the internal eMMC. This causes the system to load the updated kernel on the internal eMMC with the existing kernel modules on the microSD card.
However, this workaround means that if the microSD card is reflashed, the device will fail to load the kernel modules again. To fix this, move the /boot.bak folder back to /boot.
https://github.com/KittyEclipse/ros2_cat_software_files/
How To Run
$ xhost +
$ docker compose build && docker compose up -d
$ docker compose exec -it ros2_cat_dev bash
Inside the container:
# colcon build
# source install/local_setup.bash
# cd src/cat_robot_simulation/launch/
# ros2 launch cat_robot_launch.py
https://github.com/KittyEclipse/docker-jetson-experiments/
Docker Jetson Experiments
Setup to run various camera recognition programs in a Docker environment
How to Run
Just run run.sh; that’ll automate allowing containers to run X11 graphical apps, starting the container, and giving you a prompt to run things.
From there, you should be able to run the programs listed in app inside this Docker environment.
https://github.com/KittyEclipse/CSI-Camera/
CSI-Camera
Simple example of using a MIPI-CSI(2) Camera (like the Raspberry Pi Version 2 camera) with the NVIDIA Jetson Developer Kits with CSI camera ports. This includes the recent Jetson Nano and Jetson Xavier NX. This is support code for the article on JetsonHacks: https://wp.me/p7ZgI9-19v
For the Nanos and Xavier NX, the camera should be installed in the MIPI-CSI Camera Connector on the carrier board. The pins on the camera ribbon should face the Jetson module, the tape stripe faces outward.
Some Jetson developer kits have two CSI camera slots. You can use the sensor_mode attribute with the GStreamer nvarguscamerasrc element to specify which camera. Valid values are 0 or 1 (the default is 0 if not specified), i.e.
nvarguscamerasrc sensor_id=0
To test the camera:
# Simple Test
#  Ctrl^C to exit
# sensor_id selects the camera: 0 or 1 on Jetson Nano B01
$ gst-launch-1.0 nvarguscamerasrc sensor_id=0 ! nvoverlaysink

# More specific - width, height and framerate are from supported video modes
# Example also shows sensor_mode parameter to nvarguscamerasrc
# See table below for example video modes of example sensor
$ gst-launch-1.0 nvarguscamerasrc sensor_id=0 ! \
   'video/x-raw(memory:NVMM),width=1920, height=1080, framerate=30/1' ! \
   nvvidconv flip-method=0 ! 'video/x-raw,width=960, height=540' ! \
   nvvidconv ! nvegltransform ! nveglglessink -e
Note: The cameras may report differently than show below. You can use the simple gst-launch example above to determine the camera modes that are reported by the sensor you are using.
GST_ARGUS: 1920 x 1080 FR = 29.999999 fps Duration = 33333334 ; Analog Gain range min 1.000000, max 10.625000; Exposure Range min 13000, max 683709000;
Also, the display transform may be sensitive to width and height (in the above example, width=960, height=540). If you experience issues, check to see if your display width and height is the same ratio as the camera frame size selected (In the above example, 960x540 is 1/4 the size of 1920x1080).
Samples
simple_camera.py
simple_camera.py is a Python script which reads from the camera and displays the frame to a window on the screen using OpenCV:
$ python simple_camera.py
face_detect.py
face_detect.py is a python script which reads from the camera and uses Haar Cascades to detect faces and eyes:
$ python face_detect.py
Haar Cascades is a machine learning based approach where a cascade function is trained from a lot of positive and negative images. The function is then used to detect objects in other images.
See: https://docs.opencv.org/3.3.1/d7/d8b/tutorial_py_face_detection.html
dual_camera.py
Note: You will need install numpy for the Dual Camera Python example to work:
$ pip3 install numpy
This example is for the newer Jetson boards (Jetson Nano, Jetson Xavier NX) with two CSI-MIPI camera ports. This is a simple Python program which reads both CSI cameras and displays them in one window. The window is 1920x540. For performance, the script uses a separate thread for reading each camera image stream. To run the script:
$ python3 dual_camera.py
simple_camera.cpp
The last example is a simple C++ program which reads from the camera and displays to a window on the screen using OpenCV:
$ g++ -std=c++11 -Wall -I/usr/lib/opencv -I/usr/include/opencv4 simple_camera.cpp -L/usr/lib -lopencv_core -lopencv_highgui -lopencv_videoio -o simple_camera

$ ./simple_camera
This program is a simple outline, and does not handle needed error checking well. For better C++ code, use https://github.com/dusty-nv/jetson-utils
Notes
Camera Image Formats
You can use v4l2-ctl to determine the camera capabilities. v4l2-ctl is in the v4l-utils: ``` $ sudo apt-get install v4l-utils ``` For the Raspberry Pi V2 camera, a typical output is (assuming the camera is /dev/video0):$ v4l2-ctl --list-formats-ext
ioctl: VIDIOC_ENUM_FMT
Index : 0
Type : Video Capture
Pixel Format: 'RG10'
Name : 10-bit Bayer RGRG/GBGB
Size: Discrete 3280x2464
Interval: Discrete 0.048s (21.000 fps)
Size: Discrete 3280x1848
Interval: Discrete 0.036s (28.000 fps)
Size: Discrete 1920x1080
Interval: Discrete 0.033s (30.000 fps)
Size: Discrete 1280x720
Interval: Discrete 0.017s (60.000 fps)
Size: Discrete 1280x720
Interval: Discrete 0.017s (60.000 fps)
GStreamer Parameter
For the GStreamer pipeline, the nvvidconv flip-method parameter can rotate/flip the image. This is useful when the mounting of the camera is of a different orientation than the default.
flip-method         : video flip methods
                        flags: readable, writable, controllable
                        Enum "GstNvVideoFlipMethod" Default: 0, "none"
                           (0): none             - Identity (no rotation)
                           (1): counterclockwise - Rotate counter-clockwise 90 degrees
                           (2): rotate-180       - Rotate 180 degrees
                           (3): clockwise        - Rotate clockwise 90 degrees
                           (4): horizontal-flip  - Flip horizontally
                           (5): upper-right-diagonal - Flip across upper right/lower left diagonal
                           (6): vertical-flip    - Flip vertically
                           (7): upper-left-diagonal - Flip across upper left/low
OpenCV and Python
Starting with L4T 32.2.1 / JetPack 4.2.2, GStreamer support is built in to OpenCV. The OpenCV version is 3.3.1 for those versions. Please note that if you are using earlier versions of OpenCV (most likely installed from the Ubuntu repository), you will get 'Unable to open camera' errors.If you can open the camera in GStreamer from the command line, and have issues opening the camera in Python, check the OpenCV version.
>>>cv2.__version__
Release Notes
v3.2 Release January, 2022
- Add Exception handling to Python code
- Faster GStreamer pipelines, better performance
- Better naming of variables, simplification
- Remove Instrumented examples
- L4T 32.6.1 (JetPack 4.5)
- OpenCV 4.4.1
- Python3
- Tested on Jetson Nano B01, Jetson Xavier NX
- Tested with Raspberry Pi V2 cameras
v3.11 Release April, 2020
- Release both cameras in dual camera example (bug-fix)
v3.1 Release March, 2020
- L4T 32.3.1 (JetPack 4.3)
- OpenCV 4.1.1
- Tested on Jetson Nano B01
- Tested with Raspberry Pi v2 cameras
v3.0 December 2019
- L4T 32.3.1
- OpenCV 4.1.1.
- Tested with Raspberry Pi v2 camera
v2.0 Release September, 2019
- L4T 32.2.1 (JetPack 4.2.2)
- OpenCV 3.3.1
- Tested on Jetson Nano
Initial Release (v1.0) March, 2019
- L4T 32.1.0 (JetPack 4.2)
- Tested on Jetson Nano